Pages

31 August, 2023

Sitecore CLI - XM Cloud Plugin Cheat sheet

Documented various XM Cloud Plugin CLI commands options in the cheatography.  

Here is the link for the cheatography. 


Happy Learning !!!

30 August, 2023

Empower XM Cloud Users to view the Latest XM Cloud Deployment status in Content Editor using Sitecore PowerShell


XM Cloud Deploy App can be accessed only by Organization Admin or Organization Owner in the Sitecore Cloud Portal organization. An Organization Admin or Organization Owner can grant a team member access to the XM Cloud Deploy app by changing their organization role to Admin. For a regular XM Cloud User, this will be a black box and they do not know whether the deployment has been started or what is the status of the deployment.

In order to empower the XM Cloud Users to view the deployment status, we can leverage the power of Sitecore PowerShell and XM Cloud Deploy API to provide the status of the latest deployment. 

This approach can be enhanced to view other details from the XM Cloud Deploy App for the regular XM Cloud Users who are not Organization Admin or Organization Owner. 
The limitation in XM Cloud Deploy API is that it requires Organization Automation Client even though we need access to only certain XM Cloud Environment of a XM Cloud Project. So we need to store this information securely in encrypted connection string or get it from a Key Vault as Organization Automation Client has the power to destroy your entire XM Cloud Organization. 🤷  
In this article, we use Sitecore PowerShell Script to add a button for regular XM Cloud users to view the latest deployment status. 

Step 1: Add Integration Point & Module

With Sitecore PowerShell (SPE), there are multiple integration points available that may be added to modules. In this case, we need to add it as a Chunk in Presentation Ribbon. 
  • Add PowerShell Script Module in Script Library folder with a name. Example: Sample


  • In the newly Sample PowerShell Script Module item, add a Integration Point Libraries. This will open a window to select the integration points. In this dialog, choose Content Editor - Ribbon. This will add the ribbons which are available in this system as Script Library


  • In the Publish item, add a PowerShell Script Library called XM Cloud Deployment. This will be the name of the chunk in the Publish ribbon. And then add a PowerShell script item called Get Deployment Status. We can set an icon in the Appearance section of this item to match with the purpose of this button (/~/icon/apps/32x32/Announcements.png). 
  • In the script body, we can add this script to get the latest deployment status of the particular environment. 
  • In order to remove all the empty Ribbon libraries, go to Sample PowerShell Script Module item, right click, scripts, Purge Empty Libraries. This will remove all the empty Script Libraries. 


Step 2: Sync with Core database

Some integrations need to be synced with the Core database through the PowerShell ISE. 
  1. Open Sitecore PowerShell ISE from Launch Page. 
  2. Go to Settings Ribbon, Rebuild All button, Sync Library with Content Editor Ribbon. This will sync the newly created integration to sync with Core database. 


The below script has few optional section. 

Option 1: Checking whether the current CM hostname matches with the XM Cloud Environment hostname. Sometimes this script may be copied from different XM cloud instance and this module may show the deployment status of wrong environment.  

Option 2: Leverage the second option to show the recent deployment requests which includes recent failed, in progress, completed and queued deployment requests in a PowerShell report.  


29 August, 2023

XM Cloud CLI Plugin Commands

Summarized all the Sitecore CLI XM Cloud Plugin Commands, Subcommands and a sample execution command in the cheatography. Can be useful for the certification. 

Here is the link for the cheatography. 


Happy Learning !!!

28 August, 2023

XM Cloud Deployment Request & Statuses

In XM Cloud, we can create deployment, start, stop and cancel it in multiple ways. It can be on the Portal, CLI or Deploy API. 

In case of automation, you may be preferred to use CLI. When you create a deployment request, you can execute dotnet sitecore cloud deployment create -id HouQRMmUHaipCyCOynF6el.When you want to know the status of the deployment, you can execute dotnet sitecore cloud deployment info -id 3Gf7uCnabuO75ADYuZbJct.

To view the response in a JSON, you can execute dotnet sitecore cloud deployment info -id 3Gf7uCnabuO75ADYuZbJct --json.


There are various status fields in the response. 


Each status field has following mapping. 


25 August, 2023

XM Cloud - Deployment in Queue will be started immediately if an in-progress deployment is cancelled

In XM Cloud, with Cloud CLI, you can create and start a deployment with command dotnet sitecore cloud deployment create -id 8juVRTmGHaiaCy2Fyn56el. There is an another option to submit a deployment request but do not start automatically. This feature is not available from Cloud Portal as of 08/25/23. 

To create a deployment request and not start it immediately, you can execute the below command. 
dotnet sitecore cloud deployment create -id 8juVRTmGHaiaCy2Fyn56el --no-start

When --no-start option is used, a new deployment will be created and status will be in queued state. 


To start the deployment, you can run dotnet sitecore cloud deployment start -id <<deploymentId>>

Scenario: If there is an on-going deployment in XM Cloud and you schedule another deployment requuest with --no-start option for the future release and if for some reason, you cancel the on-going deployment, then the on-going deployment will be stopped but the queued deployment request will automatically start even though we have not executed the start request. This might have been designed in this way or may be a bug in XM Cloud Deployment job. Time to check with Sitecore support!!!

Update: Sitecore support confirmed that it is reproducible, and they are working on a fix. 
Next Update: We've been able to reproduce the scenario you reported and sought clarification from the product team regarding the observed behavior. Based on their response, this behavior is intended. Specifically, the --no-start option doesn't influence the deployment queue. If a running deployment is cancelled, completed, or fails, the next deployment in the queue will always be triggered. This functionality is by design.

In progress with one request is queued

Queued request started automatically if the previous deployment is cancelled


24 August, 2023

XM Cloud - GraphQL Endpoint Details - Delivery/Preview

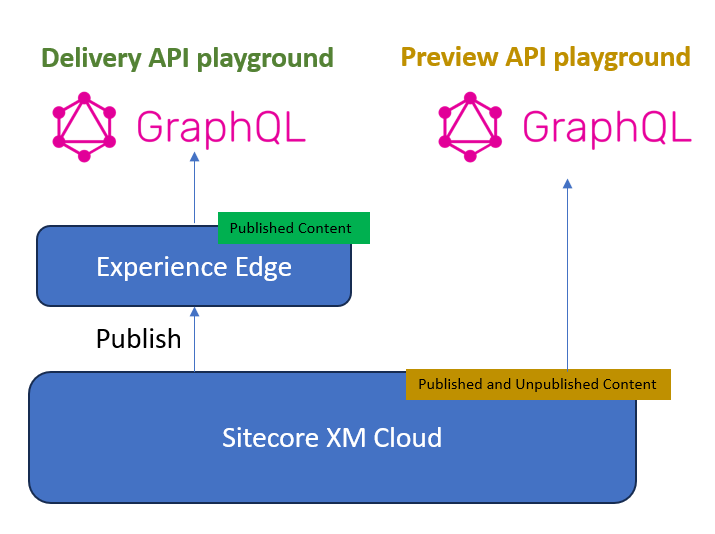
In XM Cloud, there are two GraphQL playgrounds to run queries and test the content. 

  1. Delivery API Playground
  2. Preview API Playground


Delivery API Playground

  • Uses the Delivery API of XM APIs to test the published content.
  • Delivery API is
    • accessing approved and published content from Edge.
    • optimized for performance and high availability

Preview API Playground

  • Uses Content management instance for test the published and unpublished content.


23 August, 2023

Experience Edge for XM Cloud - Token API Audience

When you create Edge API Key using Token API, you need to pass the scopes. You can refer this article on how to create edge API Key using token API. There are two scopes needed to create the Edge API Key. 

  • audience-delivery - authorizes access to the Delivery API.
  • content-#everything# - allows access to all content.

With content-#everything#, we are basically allowing all the content. In case if you want to restrict the scope only to a certain section of the content tree, there is no way as of now. As per the Limitations and restrictions of Experience Edge for XM, Experience Edge for XM only utilizes a single content scope for the whole tenant. 

When I tried to submit the API Key creation request without content scope, it spit the following error. You must include at least one content scope in the following format: 'content-{identifier}' or 'content-#everything#'. Sitecore may overcome the edge limitation by passing the Sitecore Item ID in the scope 'content-{identifier}' so that we can restrict the access to other Sitecore items via this Edge API key or {identifier} may be for different reason. 


Let's wait and see!!! 

22 August, 2023

Generate XM Cloud (Experience) Edge API Key

Ways to generate the Edge API Key

Edge API Key can be generated in three ways.
  1. Using Token API
  2. Using XM Cloud Deploy REST API
  3. Using XM Cloud Portal
In general, there are three steps to follow to create the Edge API Key.
  • Create client details from Cloud Portal. This will get you client id and client secret. 
  • Request JWT using client id and client secret. JWT is the access token to be used for the next step. 
  • Using the JWT, request for API Key. 
Option 1: Using Token API

Step 1: Create Edge Administration Client for an XM Cloud Environment 
  • Go to XM Cloud Deploy App (https://deploy.sitecorecloud.io/) → Credentials Environment Create Credentials → Edge Administration → Create
  • Copy client id and client secret. Client secret should be copied now and it cannot be retrieved again. 
Generate Edge Administration Credential

Select Environment

Copy Client ID and Client Secret

Step 2: Request JWT for Experience Edge using Client ID and Secret

Sending a POST request with the client id and client secret will provide the access_token which can be used to create the API Key.


Step 3: Create API Key using generated access_token. 

Sending a POST request to https://edge.sitecorecloud.io/api/apikey/v1 with scopes "audience-delivery" (authorizes access to the Delivery API) and "content-#everything#" and access_token as bearer token (allows access to all content) will generate the API key. With this Edge API key in the HTTP headers, you will be able to query data and see the results returned. In the below sample request, sc_apikey will be K3p2VCt1VHNsT1pwNFFXBhbWVtZWF0cmEzMmYwLXhtY2xvdWRuZWhlbS1kZXYtMmRmZQ==.

Option 2: Using XM Cloud Deploy REST API

Step 1: Create Organization or Environment Automation Client  

Similar to Step 1 of Option 1, you can create Organization or Environment automation client from the cloud portal. 
  • For Organization Credential: Go to XM Cloud Deploy App (https://deploy.sitecorecloud.io/) → Credentials → Create Credentials → Create
  • For Environment Credential: Go to XM Cloud Deploy App (https://deploy.sitecorecloud.io/) → Credentials → Environment → Create Credentials → Automation → Create
  • Copy client id and client secret. Client secret should be copied now and it cannot be retrieved again. 

Step 2: Request JWT for Experience Edge using Client ID and Secret

Sending a POST request with the client id and client secret will provide the access_token which can be used to create the API Key. 


Step 3: Create API Key using Deploy API. 

Sending a POST request to https://xmclouddeploy-api.sitecorecloud.io/api/environments/v1/<your_environment_id>/obtain-edge-token with access_token as bearer token will generate the API key. Replace the HTTP request URL with the appropriate environment ID. Response will have the apiKey. 


Option 3: Using XM Cloud Portal

XM Cloud Edge API key for an environment can be retrieved from two different places in Cloud Portal

XM Cloud Portal App Dashboard
  • In the XM Cloud App Dashboard, click Sites, in the action menu , click Settings, click Developer Settings and get the Key from SITECORE_API_KEY environment variable. 

XM Cloud Deploy App
  • In the XM Cloud Deploy App, click Projects, click the project that you created, click the Environment, click Details tab and get the Key from Edge token value variable. 

21 August, 2023

XM Cloud URLs

There are so many additions to the Sitecore XM Cloud offerings. I have listed their URLs in this post for better understanding. 

Title URL
Cloud Portal https://portal.sitecorecloud.io/
Apps https://xmapps.sitecorecloud.io/
Deploy App https://deploy.sitecorecloud.io/
Deploy API https://xmclouddeploy-api.sitecorecloud.io/
Explorer Apphttps://explorer.sitecorecloud.io/
Monitoring API for logs https://xmcloud-monitoring-api.sitecorecloud.io/
OAuth Audience for XM Cloud using API (default) https://api.sitecorecloud.io/
OAuth Audience for Sitecore deployment using DevEx Plugin https://xmcloud-cm.sitecorecloud.io/
OAuth token endpoint https://auth.sitecorecloud.io/oauth/token
Page Editor https://pages.sitecorecloud.io/
Authority URL https://auth.sitecorecloud.io/

All XM Cloud Deploy API related documentation is generated using Swagger UI. https://xmclouddeploy-api.sitecorecloud.io/swagger/index.html.


15 August, 2023

Useful Sitecore PowerShell Scripts

In this blog post, I am sharing some of the useful SPE scripts which I used in my previous project. 

Remove Sitecore Originator Field Value

Originator field indicates the branch template used to create the item. In case if the branch template is deleted, the field may be left out with orphaned GUID value. 

Either the entire content tree can be parsed whether there is any orphaned GUID in that field or use Scan the database for broken links in Sitecore Control panel. In the below script, I took the list of items with broken originator field and created an CSV with Column ID for Item ID and script will intake the excel and clear the Originator field. 


Apply random image to article pages

One of the ask is to upload a set of images in Media library and randomly apply one image to each of the article pages which are already created in Sitecore. 

First, we uploaded all the images in a folder in Media library. Then executed the below script which will randomly choose one image and apply it in each article page. We also added a step to publish the page. 

Remove Orphaned Renderings

In certain scenarios, content authors reports us to remove any orphaned renderings across the site. Though it is different between each Sitecore solutions, below code can be leveraged to build custom script and remove renderings. Thanks to Aaron Bickle who provided a starter kit for this task and was able to customize for our solution. 

Sitecore


blockquote { margin: 0; } blockquote p { padding: 15px; background: #eee; border-radius: 5px; } blockquote p::before { content: '\201C'; } blockquote p::after { content: '\201D'; }